This blog explains the integration option to export data entities from Dynamics 365 F&O into a Microsoft Azure SQL database. D365FO provides a feature via Data Management Frame called bring your own database (BYOD). The BYOD feature lets D365 administrators export one or more data entities that are available in D365FO into an Azure SQL database.

The BYOD feature lets:
- Define one or more SQL databases that admin can export D365 FO entity data into.
- Export either all the records (full push) or only the records that have changed or been deleted (incremental push).
- Use the rich scheduling capabilities of the batch framework to enable periodic exports.
- Access the entity database by using Transact-SQL (T-SQL), and even extend the database by adding more tables.
The BYOD feature is recommended for the following use cases:
- You must export data into your own data warehouse.
- You use analytical tools other than Power BI, and those tools require T-SQL access to data.
- You must perform batch integration with other systems.
D365 FO BYOD: Steps to setup the BYOD for Integration

D365 FO BYOD: Steps to Create Azure SQL Database
To create a resource group, server, and single database in the Azure portal:
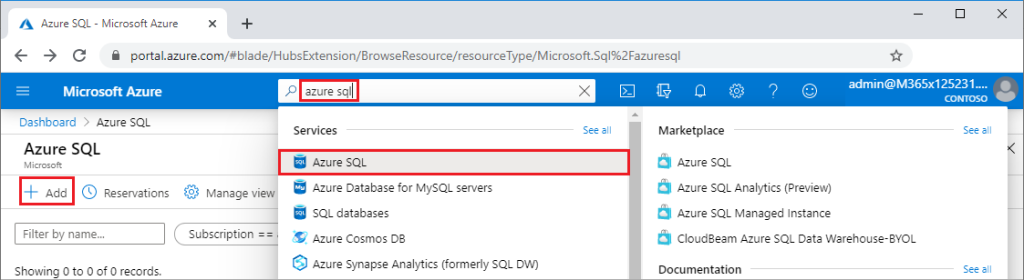
- Sign in to the portal.
- From the Search bar, search for and select Azure SQL.
- On the Azure SQL page, select Add.
- On the Select SQL deployment options page, select the SQL databases tile, with Single database under Resource type. You can view more information about the different databases by selecting Show details.
- Select Create.

- On the Basics tab of the Create SQL database form, under Project details, select the correct Azure Subscription if it isn’t already selected.
- Under Resource Group, select Create new, enter resourceGroupName, and select OK.
- Under Database details, for Database name enter D365FOBYODDEV.
- For Server, select Create New, and fill out the New server form as follows:
- Server name: Enter D365FOBYODDEV, and some characters for uniqueness.
- Server admin login: Enter azureuser.
- Password: Enter a password that meets requirements, and enter it again in the Confirm password field.
- Location: Drop down and choose a location, such as West Europe.Select OK.

- Record the server admin login and password so you can log in to the server and its databases. If you forget your login or password, you can get the login name or reset the password on the SQL server page after database creation. To open the SQL server page, select the server name on the database Overview page.
- Under Compute + storage, if you want to reconfigure the defaults, select Configure database. On the Configure page, you can optionally:
- Change the Compute tier from Provisioned to Serverless.
- Review and change the settings for vCores and Data max size.
- Select Change configuration to change the hardware generation.After making any changes, select Apply.
- Select Next: Networking at the bottom of the page.

- On the Networking tab, under Connectivity method, select Public endpoint.
- Under Firewall rules, set Add current client IP address to Yes.
- Select Next: Additional settings at the bottom of the page.

- For more information about firewall settings, see Allow Azure services and resources to access this server and Add a private endpoint.
- On the Additional settings tab, in the Data source section, for Use existing data, select Sample.
- Select Review + create at the bottom of the page.
Get the connection string details from the Azure portal
Log In to the Azure portal, go to your Azure Database for SQL server, and then click Connection strings to get the string list for BYOD instance:

D365 FO BYOD Data source Configuration
- Log into D365FO
- Then Go to Systems Administrations > Workspace > Data management
- Click on > Configure Entity Export to database

- Then click on New
Now fill the data- source name and
- description
- Enter the connection string. It should be in the format:
Data Source={azure.database.windows.net},1433;Initial Catalog={database};Integrated Security=False;User ID={userid};Password={password}
- The click on Validate
Note: You have to add the client ip on Azure SQL Firewall

Publishing Data Entities
To make a data entity available in your BYOD database, you need to first publish it. This simply creates the table in the BYOD database. The Publish page enables several scenarios:
- Publish new entities to the database.
- Delete previously published entities from the database. (For example, you might want to re-create the schema.)
- Compare published entities with the entity schema. (For example, if new fields are added later, you can compare the fields with your database schema.)
- Configure change tracking functionality that enables incremental updates of your data.
- Now Go back to Systems Administrations > Workspace > Data management
- Click on > Data Entities

- Now select the required Entity which you want to export, then click on Publish
- Select the BYOD source name which was created using previous step and click publish

- A Job Will schedule and Message will appear once job complete and a table will be created to targeted DB.
There is the option to set CHANGE TRACKING for each entity. If the change tracking is enabled for an entity, then you will be able to export incrementally. If you do not set this, then you can only do a full export. This feature must be set individually for each exporting entities
Create Data Job and Export
- Now Go back to Systems Administrations > Workspace > Data management
- Click on > Export Data

- Now fill the required fields Like Name and Select Target data format as the BYOD Data source, Default refresh type should be incremental or Full push (based on the use case) then click on Add

- Once you fill all the required fields, You are ready to export

- After completion of data export you can verify on your targeted data source in Azure Database
The BYOD feature has the following limitations.
There should be no active locks on your database during synchronization
You can’t export composite entities into your own database
Entities that don’t have unique keys can’t be exported by using incremental push
Comments
Post a Comment