Download Software deployment package
Open your VM, go to LCS > Shared Asset library

Go to “Software deployable package” > Select the Service update you want to download and save it. The package is very large (5-6 GB) so it can take a while to download

Unblock (Properties > General) the zip file before unzipping it to a non-user folder on the VM.

Unzip the contents to a local directory (like c:\Altitudo\10_0_23) . Make sure that the zip file is stored in a non-user folder.
This operation can take several minutes

Collect topology configuration data
In the folder where you extracted the deployable package, find and open the file that is named DefaultTopologyData.xml. You must specify the VM name and the installed components in this file.
- To specify the VM name, follow these steps:
- In File Explorer, right-click This PC, and then select Properties.
- In the system properties, find and make a note of the computer name (for example, AOS-950ed2c3e7b).
- In the DefaultTopologyData.xml file, replace the machine name with the computer name that you found in the previous step.


To specify the installed components, follow these steps:
- Open a Command Prompt window as an administrator.
- Go to the extracted folder, and run the following command to see a list of all the components that are installed on the computer.
- Update the DefaultTopologyData.xml file with the list of components.
AXUpdateInstaller.exe list
Copy the installed components into a block note
Open DefaultTopologyData.xml and :
- add the vm name in the <Name> tag (like shown below)
- add the installed components into the <string> tags (like shown below)
- Save DefaultTopologyData.xml

After mofications the xml file should look like this

Generate a runbook from the topology
Based on the topology information in the DefaultTopologyData.xml file, you must generate the runbook file that will provide step-by-step instructions for updating each VM.
Run the following command to generate the runbook.
AXUpdateInstaller.exe generate -runbookid="10_0_23_runbook" -topologyfile="DefaultTopologyData.xml" -servicemodelfile="DefaultServiceModelData.xml" -runbookfile="10_0_23_runbook.xml"Change the parameters runbookid and runbookfile giving them unique names (like 10_0_23_runbook or something like that)

Here is an explanation of the parameters that are used in this command:
- [runbookID]– A parameter that is specified by the developer who applies the deployable package.
- [topologyFile]– The path of the DefaultTopologyData.xml file.
- [serviceModelFile]– The path of the DefaultServiceModelData.xml file.
- [runbookFile]– The name of the runbook file to generate (for example, AOSRunbook.xml).
After command is executed the runbook file “10_0_23_runbook.xml” will be created (like shown below)

Install a deployable package
- Import the runbook by running the following command.
AXUpdateInstaller.exe import -runbookfile=[runbookFile]Example
AXUpdateInstaller.exe import -runbookfile="10_0_23_runbook.xml"- Verify the runbook.
AXUpdateInstaller.exe list- Run the runbook
AXUpdateInstaller.exe execute -runbookid=[runbookID]Example
AXUpdateInstaller.exe execute -runbookid="10_0_23_runbook"AXUpdateInstaller updates the runbook file after each step is run on a VM. The runbook also logs information about each step.
This operartion can take several hours

- Export the runbook.
AXUpdateInstaller.exe export -runbookid=[runbookID] -runbookfile=[runbookFile]Example
AXUpdateInstaller.exe export -runbookid=10_0_23_runbook -runbookfile=10_0_23_runbook.xmlVerify installation
Run the following command to verify that the new updates are installed.
AXUpdateInstaller.exe list > listcomponentsupdated.txtVerify if the update has taken place by comparing the previos components copied into the notebool with the listcomponentsupdated.txt file.

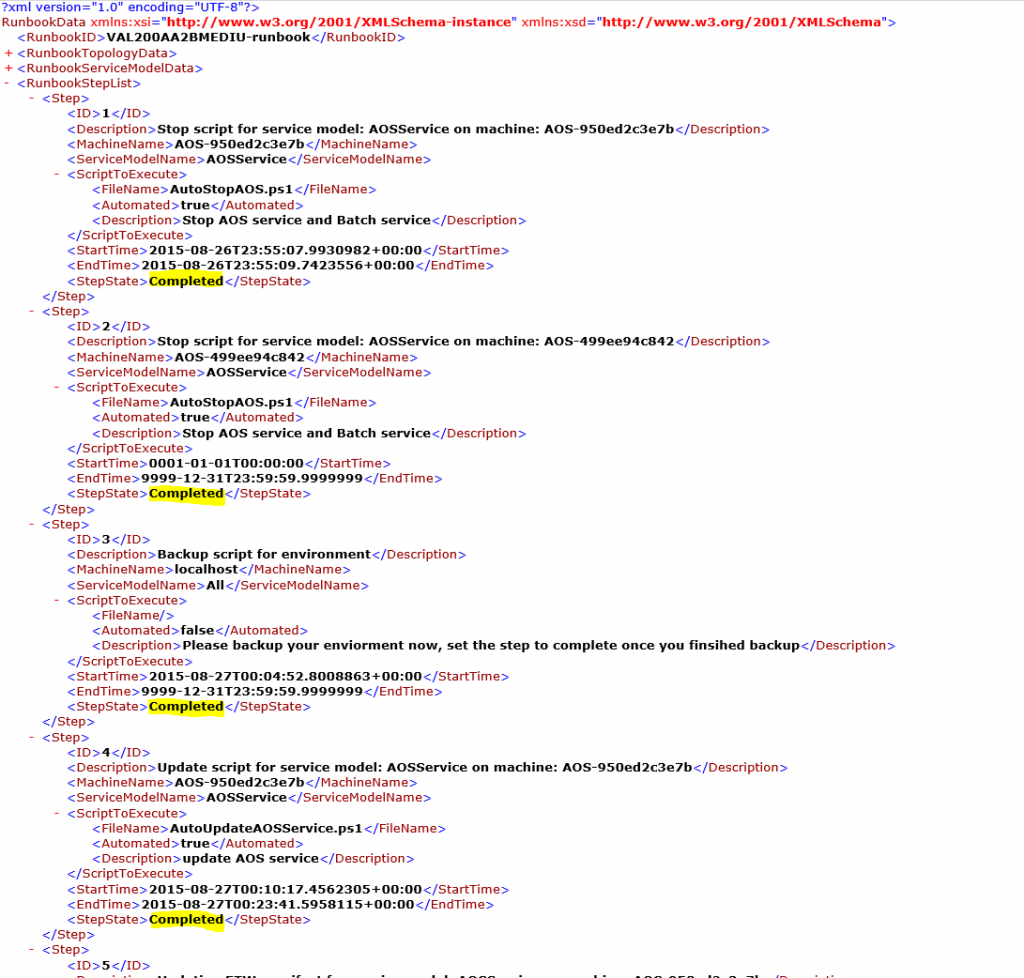
View the runbook to see the completed steps. Here is an example of a runbook file where the steps have been completed.
To be sure the environment has been updated go to D365 Portal home page > Info tab > About

And you’ll see the new installed version

Troubleshooting
If any step in the runbook fails, you can rerun it by running the following command.
AXUpdateInstaller.exe execute -runbookid=[runbookID] -rerunstep=[stepID]Example
AXUpdateInstaller.exe execute -runbookid= -rerunstep=24Common issues
- Error on step DB sync on D365FO update
When applying an update to Dynamics 365 for Finance and Operations on a local development VM, sometimes the update fails on the Sync AX database step (it’s usually step 24) with the following error.
1 | The running command stopped because the preference variable "ErrorActionPreference" or common parameter is set to Stop: System.Management.Automation.RuntimeException: An exception of type System.Net.WebException occurred when making an http request to: http://127.0.0.1/ReportServer. Refer to the log file for more details. |
The problem seems to be that the SSRS service is not started. In order to fix this, start the service and re-run from the failing step.
It’s worth noting that this seems to be a bug in the upgrade script. If you try to solve the problem by making sure that the service is running before starting the upgrade script, it won’t work.
This is due to the fact that the upgrade script stops the service, most likely in a earlier step, but doesn’t start it again.
We have tested to start the SSRS service when the upgrade script hits this step. That seems to work as it’s usually quite a few minutes before this step throws the exception.
- Error on step Retail Self Service on D365FO update
When applying an update to Dynamics 365 for Finance and Operations on a local development VM, sometimes the update fails on the Update Retail self service step (it’s usually step 52). See error message below.
Executing step: 52
GlobalUpdate script for service model: RetailSelfService on machine: <machine name>
Update Retail self service.
UpdateRetailSelfService.ps1 failed.
try{
  $erroractionpreference = 'stop';
  &'<source path>\RetailSelfService\scripts\Upgrade\UpdateRetailSelfService.ps1'
}
catch
{
  $erroractionpreference = 'Continue';
  Write-Error ($_ | Format-List * -Force | Out-String -Width 4096);
  [Environment]::Exit(999)
}  :
PSMessageDetails      :
Exception             : System.Management.Automation.RuntimeException: Script execution failed. Please find the logs at <caller path>\UpdateRetailSelfService.log.
TargetObject          : Script execution failed. Please find the logs at <caller path>\UpdateRetailSelfService.log.
CategoryInfo          : OperationStopped: (Script executio...elfService.log.:String) [], RuntimeException
FullyQualifiedErrorId : Script execution failed. Pl
The problem seems to be that the Azure Storage Emulator is not started. In order to fix this, start the emulator and re-run from the failing step.
The Azure Storage Emulator can be started by running the following command in a command prompt running as administrator.
\"Program Files (x86)"\"Microsoft SDKs"\Azure\"Storage Emulator"\AzureStorageEmulator.exe start
If this doesn’t solve the issue it means that In-place update or deployment of customizations of Dynamics AX on a locally deployed VHD is not supported at this time. You may use an LCS deployed developer topology for development scenarios.’
So just bypass this step and pass to the next one.
Comments
Post a Comment